
Have you ever had to make lemons into lemonade in life? April is National Stress Awareness Month and Craft Yarn Council has a campaign Stitch Stress Away. Craft Yarn Council did a survey with some fascinating results, 85% of people who crochet or knit experience stress reduction. I personally use crochet to help with my stress levels and last week I had one of the most stressful weeks so I had to lemonade out of lemons. With the inspiration of Twinkie Chan’s Lemon Pillow design for Stress Stitch Away I pulled out an old design I started 3 years ago for a Crocheted Lemon Deco Pillow.
One of my favorite things to do is crochet at the beach. I love sitting and counting my stitches to the sound of waves hitting the sand and smelling the salty ocean. More of my favorite was to relax are:
- Crochet
- Go to the beach
- Make bread
- Sew
- Go for walk
- Get a massage
- Take a hot bath
- Call a friend
- Yoga
- Watch a funny movie
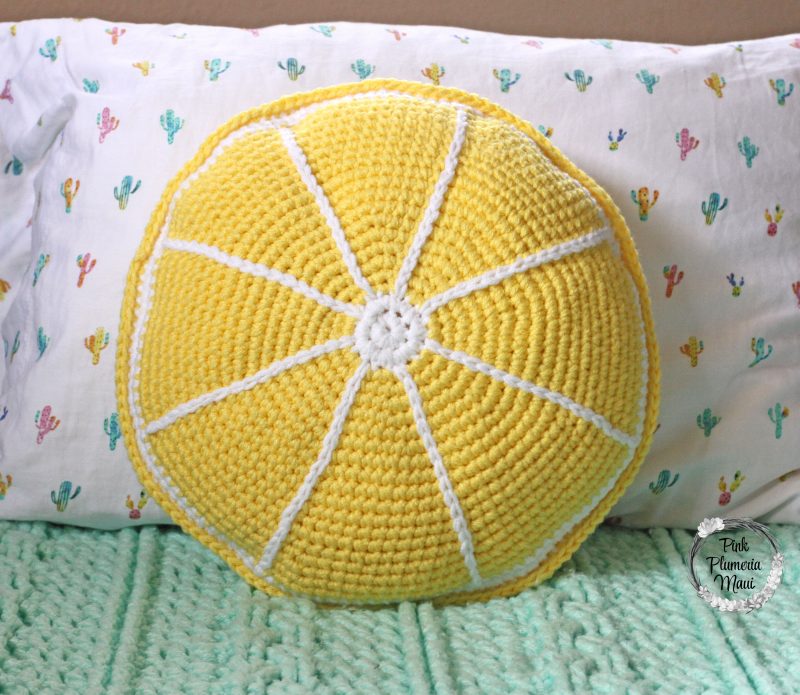
The free pattern for a Crocheted Lemon Deco Pillow works up quickly. I used 2 strands of Red Heart with Love but you can use 2 strands of any other yarn in worsted weight. You can also modify this pattern to be used as an orange, lime or grapefruit by changing colors.

Materials Needed:
Worsted Weight Yarn. I used Red Heart With Love in Daffodil(2 Skeins), Red Heart With Love in White(1 Skein split in 2)
K Hook, J Hook, I used a Clover Armour for all
Abbreviations:
SC = Single Crochet
SF SL ST = Surface Slip Stitch
SL ST = Slip Stitch
Front of Lemon:
With 2 strands of White make a magic ring.
Row 1: CH 1, SC 8 times in magic ring. SL ST to top of CH 1. (8 SC)
Row 2: CH 1, 2 SC in each stitch around, SL ST to top of CH 1. Pull a tail and fasten off. (16 SC)
Row 3: Attach Daffodil, CH 1, SC in first stitch, 2 SC in next, repeat this all the way around until the last 2 SC. You will have the true last stitch and the previous carry over from slip stitch and to make it so you can’t see this gap. SC in last stitch and then SC in that SL ST gap. SL ST to first CH 1. (24 SC)
Row 4: You will now be working a continuous circle so grab your stitch marker. SC in next 2 stitches, then 2 SC in next. Repeat this all the way around under you come to your stitch marker. (32 SC)
Row 5: SC in next 3 stitches, then 2 SC in next. Repeat this all the way around under you come to your stitch marker. (40 SC)
Row 6: SC in next 4 stitches, then 2 SC in next. Repeat this all the way around under you come to your stitch marker. (48 SC)
Row 7: SC in next 5 stitches, then 2 SC in next. Repeat this all the way around under you come to your stitch marker. (56 SC)
Row 8: SC in next 6 stitches, then 2 SC in next. Repeat this all the way around under you come to your stitch marker. (64 SC)
Row 9: SC in next 7 stitches, then 2 SC in next. Repeat this all the way around under you come to your stitch marker. (72 SC)
Row 10: SC in next 8 stitches, then 2 SC in next. Repeat this all the way around under you come to your stitch marker. (80 SC)
Row 11: SC around until your stitch marker. (80 SC)
Row 12: SC in next 9 stitches, then 2 SC in next. Repeat this all the way around under you come to your stitch marker. (88 SC)
Row 13 – 14: SC around until your stitch marker. (88 SC)
Row 15: SC in next 10 stitches, then 2 SC in next. Repeat this all the way around under you come to your stitch marker. (96 SC)
Row 16: SC around until your stitch marker. (96 SC)
Row 17: SC in next 11 stitches, then 2 SC in next. Repeat this all the way around under you come to your stitch marker. (104 SC)
Row 18: SC in next 12 stitches, then 2 SC in next. Repeat this all the way around under you come to your stitch marker. (112 SC)
Row 19: SC in next 13 stitches, then 2 SC in next. Repeat this all the way around under you come to your stitch marker. (120 SC)
Row 20: SC in next 14 stitches, then 2 SC in next. Repeat this all the way around under you come to your stitch marker, SL ST to next stitch and fasten off leaving a tail. (128 SC)
Row 21: Attach White in same spot as SL ST, CH 1, SC all around and SL ST to top of CH 1. (128 SC)
Row 22: CH 1, SC in next 15 stitches, then 2 SC in next. Repeat this all the way around under you come to end and SL ST to top of CH 1, fasten off and leave a tail for sewing in. (136 SC)
Back side of Lemon, Do same as the front except crochet entire back in yellow and crochet in continuous circle with a stitch marker. OMIT all SL ST and CH 1’s in Row 1, 2, 3, 21 & 22. Don’t fasten off when you’re done.
How to Surface Slip Stitch Lines:
With 2 strands of White Yarn you will surface stitch your lines. You may wonder how I got the lines so straight. First, on Row 2 there’s going to be easy visual reference where to start by using every other stitch as there’s 16 stitches and you need 8 lines. Second, Cut a scrap pieces of yarn about 12 inches long. Weave the strand in the first place you want to start with end on wrong side of lemon, then go straight up to top of lemon where you want to stop and weave end in with your hook. Turn your lemon over and you will have 2 ends of yarn and tie like your shoe laces and you can do this snuggly so it won’t move around. You will then be able to flip your work over and surface slip stitch next to the piece of yarn. Then untie and move to the next stop and repeat. You may have to practice a few times to get a straight line and use yarn line as a guide but once you get you’re fly through the rest.
Assembly:
Knot your ends on the inside. Put both wrong sides together. You will CH 1 from the back piece of your Crocheted Lemon Deco Pillow, after CH 1 you will flip your work so you have front of Lemon facing you and both pieces together. SC through both pieces, your stitches will line up since you will have same number of stitches on front and back. Continue to SC around, about 3/4 done you can stuff with your polyfill and with 7-10 stitches left you can finish filling to your liking. SL ST to CH 1, leave a tail to sew in and fasten off. Sew tails in one at a time in the back where they won’t be seen.

Now you can display your Crocheted Lemon Deco Pillow on your couch or your bed for everyone to enjoy! Follow me and share your pictures on Instagram using hash-tag #pinkplumeriamaui. Follow me on Pinterest to see what I’m pinning and don’t forget to sign up for my newsletter.
Please note, some of these links are affiliate link, which means that if you click on one of the product links, I’ll receive a small commission. This helps support the blog and allows me to continue to make free content. I only recommend products that I use and love. Thank you for your support. You can read my full disclosure.
**You can NOT copy pattern (or part of a pattern) and publish it on another website or other publication. Instead, you can publish a link to the pattern. You may sell products made from this pattern but not the pattern. I ask that you link back to my post. Please do not copy of reproduce pictures. When in doubt ask me, tonjapebenito@gmail.com.**


