 Welcome to my free crochet pattern for How to Make a Crocheted C2C Cactus Beanie. Have you used the crocheted C2C (corner to corner) technique to make a beanie? I started researching and there are not many patterns available so I when I designed this hat I wanted to create instructions to help with each step. It’s easy once you get going and works up very fast. I loved using the Crocheted C2C Cactus Square pattern as a base to create this beanie. I have written up a separate post for the Youth/kids version that would fit from a toddler to a older child.
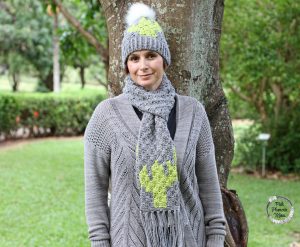 Check out my tutorial on How to Join Crocheted C2C Projects. Using the graph for this pattern you can customize colors if you desire. There are endless options for colors and yarn. I used worsted weight Caron Simply Soft by Yarnspirations as I really like the feel and wear of this yarn in beanies. Adding a Faux Fur Pom Pom adds a super cute touch. You can also make a pom pom with you’re yarn or chose a alternative color like pink, yellow or orange. The matching Crocheted C2C Cactus Scarf Pattern is available too.
Are you new to crochet C2C? ChiWei at www.1dogwolf.com has an excellent blog post with helpful information to answer questions about crochet C2C. Here are some of my tips:
- Grab a clip board and pen for your graph, I use a metallic sharpie to dot my squares at the beginning of each row.
- Prep your yarn by rolling into balls and separating skein into balls. I use a scale to weigh and break my yarn into 2, 3 or 4 even balls if needed. This will depend of on the size of your graph. This is a large graph so I rolled my skeins into balls and only split 1 grey into 2 balls and 1 green into 2 balls for arms of the cactus.
- Keep your ends on the back side with changing colors.
- Count your clusters every row to help eliminate mistakes.
- Change colors on the last pull through of last DC in cluster. This will create invisible color changes.
Check out my other Crocheted C2C Patterns: Crocheted C2C Cactus Blanket Part 1, Crocheted C2C Cacti Baby Blanket, Bulky Crocheted C2C Cactus Blanket, Crocheted C2c Cactus ALOE! Blanket, Crocheted C2C Cactus Baby Blanket, Crocheted C2C Cactus Pot Holder, Crocheted C2C Cactus Wall Hanging, and Crocheted C2C Cactus Pillow. All are projects that work up quick and are fun additions to your house or great gifts.
Materials Needed:
Crocheted C2C Cactus Beanie Pattern
How to Join Crocheted C2C Projects
Worsted Weight Yarn. 1 Skein Caron Simply Soft Tweed Grey, 1 Skein Caron Simply Soft Chartreuse
Abbreviations:
CH = Chain
SC = Single Crochet
DC = Double Crochet
HDC = Half Double Crochet
BP HDC = Back Post Half Double Crochet
SL ST = Slip Stitch

Create the brim of your beanie. CH 11
Row 1. HDC in 2nd stitch from hook and each stitch across for 10 HDC’s.
Row 2: CH 1, BP HDC for each stitch.
Row 3 – 65 (ALL ODD NUMBER ROWS): HDC in each stitch across.
Row 4 – 66 (ALL EVEN NUMBER ROWS): CH 1, BP HDC for each stitch.
Press both ends of work together and SL ST uP Back, this row will be the inside back of your hat.
To create body of hat have a print out of Crocheted C2C Cactus Beanie Pattern.
Using Graph and How to Join Crocheted C2C Projects.
CH 1, 100 SC loosely around brim, SL ST to CH 1
Row 1: CH 3, skip 3 SC, SL ST, CH 3, 3 DC on CH 3 gap.
Row 2: CH 6, DC in 4th chain from hook, DC in 5th and 6th chain, SL ST to CH 3 on 1st cluster, CH 3 and 3 DC. Skip 3 SC and SL ST.
Row 3: CH 3, skip 3 SC, SL ST, CH 3, 3 DC on CH 3 gap. complete 2nd and 3rd cluster.
Row 4: CH 6, DC in 4th chain from hook, DC in 5th and 6th chain, Complete cluster 2nd, 3rd, and 4th cluster. Skip 3 SC, SL ST.
Row 5: CH 3, skip 3 SC, SL ST, CH 3, 3 DC on CH 3 gap. complete 2nd, 3rd, 4th and 5th cluster.
Row 6: CH 6, DC in 4th chain from hook, DC in 5th and 6th chain, Complete cluster 2nd, 3rd, 4th, 5th and 6th cluster. Skip 3 SC, SL ST.
Row 7: CH 3, skip 3 SC, SL ST, CH 3, 3 DC on CH 3 gap. complete 2nd, 3rd, 4th, 5th, 6th and 7th cluster.
Row 8: CH 6, DC in 4th chain from hook, DC in 5th and 6th chain, Complete cluster 2nd, 3rd, 4th, 5th, 6th, 7th and 8th cluster. Skip 3 SC, SL ST.
Row 9: CH 3, skip 3 SC, SL ST, CH 3, 3 DC on CH 3 gap. complete 2nd – 8th cluster. SL ST 4 times to CH 3 gap on last cluster. This is a continuous decrease for remaining of beanies at the height of graph is only 8 clusters.
Row 10: CH 3, 3 DC, complete 2nd – 8th cluster. Skip 3 SC, SL ST.
Row 11: CH 3, skip 3 SC, SL ST, CH 3, 3 DC on CH 3 gap. complete 2nd – 8th cluster. SL ST 4 times to CH 3 gap on last cluster.
Row 12: CH 3, 3 DC, complete 2nd – 6th cluster. On the last DC of 7th cluster change color to green, leaving grey yarn on wrong side of beanie. create 8th cluster in green. Skip 3 SC, SL ST. Leave grey yarn as you will color change back on next row.
Row 13: CH 3, skip 3 SC, SL ST, CH 3, 3 DC on CH 3 gap. create 2nd cluster, on last DC change color to grey and carry green yarn behind. 3rd cluster is grey but change back to green at the end of last DC, carry grey yarn behind. Cluster 4 and 5 are green, again changing back to grey for 6th – 8th cluster. SL ST 4 times to CH 3 gap on last cluster.
Row 14: CH 3, 3 DC, create 1st and 2nd cluster with change to green at the end of the 2 cluster. Create 3rd – 8th cluster in green. Skip 3 SC, change color to grey on SL ST. This is where you will use additional balls of yarn where you cannot carry your colors.
Row 15: CH 3, skip 3 SC, SL ST, CH 3, on CH 3 gap, 2 DC, on end of 3rd DC change to green. Create 2nd – 7th cluster, on the end of 7th cluster change back to grey for 8th cluster. SL ST 4 times to CH 3 gap on last cluster.
Row 16: CH 3, 3 DC change color to green on 3rd DC. On 2nd cluster change back to grey on last DC. On 3rd cluster change back to green, create 4th – 6th cluster changing back to grey on last DC on 6th cluster. Complete 7th and 8th cluster. Skip 3 SC, SL ST.
Row 17: CH 3, skip 3 SC, SL ST, CH 3, 3 DC on CH 3 gap. create 2nd cluster changing to green on last DC. Create 3rd – 6th cluster, changing to grey on the last DC on 6th cluster. Create 7th cluster, changing back to green on last DC. Create 8th cluster. SL ST 3 times, on 4th SL ST in to CH 3 gap change to grey.
Row 18: CH 3, 3 DC changing to green on last last DC. Create 2nd – 6th cluster change back to grey on last DC. Create 7th and 8th cluster. Skip 3 SC, SL ST.
Row 19: CH 3, skip 3 SC, SL ST, CH 3, 3 DC on CH 3 gap. create 2nd – 3rd cluster changing to green on last DC. Create 4th changing to grey on the last DC. Create 5th cluster, changing back to green on last DC. Create 6th – 7th cluster changing back to grey on last DC. Create 8th cluster. SL ST 3 times, on 4th SL ST in to CH 3 gap change to green.
Row 20: CH 3, 3 DC, create 2nd cluster changing to grey on last DC. Create 3rd cluster changing back to green on last DC. Create 4th and 5th cluster changing to grey on the last DC. Create 6th – 8th cluster. Skip 3 SC, SL ST.
Row 21: CH 3, skip 3 SC, SL ST, CH 3, 3 DC on CH 3 gap. create 2nd – 4th cluster changing to green on last DC. Create 5th and 6th cluster changing to grey on last DC. Create 7th and 8th cluster. SL ST 4 times to CH 3 gap on last cluster.
Row 22: CH 3, 3 DC change color to green on 3rd DC. Create 2nd and 3rd cluster changing to grey on last DC. Create 4th – 8th cluster. Skip 3 SC, SL ST.
Row 23: CH 3, skip 3 SC, SL ST, CH 3, 3 DC on CH 3 gap. complete 2nd and 8th cluster. SL ST 4 times to CH 3 gap on last cluster.
Row 24: CH 3, 3 DC, complete 2nd – 8th cluster. Skip 3 SC, SL ST.
Row 25: CH 3, skip 3 SC, SL ST, CH 3, 3 DC on CH 3 gap. complete 2nd and 8th cluster. SL ST 4 times to CH 3 gap on last cluster.
Now as you decrease at the end of the row you will join the back of hat as you go. Then after joining create next row until the very last cluster.
Row 26: CH 3, 3 DC, complete 2nd – 7th clusters. SL ST through CH 3 and 1st gap on other back side of beanie joining them. SL ST through both up 3 times. Last SL ST into CH 3 side you are finishing.
Row 27: CH 3, 3 DC, create 2nd – 6th clusters. SL ST 4 times to CH 3 gap on last cluster.
Row 28: CH 3, 3 DC, complete 2nd – 5th clusters. SL ST through CH 3 and 1st gap on other back side of beanie joining them. SL ST through both up 3 times. Last SL ST into CH 3 side you are finishing.
Row 29: CH 3, 3 DC, create 2nd – 4th clusters. SL ST 4 times to CH 3 gap on last cluster.
Row 30: CH 3, 3 DC, complete 2nd – 3rdth clusters. SL ST through CH 3 and 1st gap on other back side of beanie joining them. SL ST through both up 3 times. Last SL ST into CH 3 side you are finishing.
Row 31: CH 3, 3 DC, create 2nd. SL ST 4 times to CH 3 gap on last cluster.
Row 32: CH 3, 3 DC, SL ST through CH 3 and 1st gap on other back side of beanie joining them. SL ST through both up 3 times. Last SL ST into CH 3 side you are finishing.
Row 33: CH 1, 3 SC on CH 3 gap, continuous all the way around. SL ST to CH 1.
Row 34: Ch 1, SC TOG around. SL ST to top of CH 1.
Row 35: CH 1, SC TOG around . SL ST to top of CH 1. Leave a 6 inch tail to sew the top of beanie closed.
With tapestry needle weave yarn in and out of SC’s, turn so wrong side is out, pull yarn to close hole and sew end in.
 If you desire you can add a pom pom or a faux fur pom pom. You can also add a flower using first layer from my Crocheted Layered Flower Pattern with pink yarn an H Hook and sew on.
The matching Crocheted C2C Cactus Scarf Pattern is looks fabulous with a Crocheted C2C Cactus Beanie.
Who will your Crocheted C2C Cactus Beanie be for? What colors will you use? I would love to see what you make. Follow me and share your pictures on Instagram using by hash-tag #pinkplumeriamaui. Follow me on Pinterest to see what I’m pinning and don’t forget to sign up for my newsletter.
 Please note, some of these links are affiliate link, which means that if you click on one of the product links, I’ll receive a small commission. This helps support the blog and allows me to continue to make free content. I only recommend products that I use and love. Thank you for your support. You can read my full disclosure.
**You can NOT copy pattern (or part of a pattern) and publish it on another website or other publication. Instead, you can publish a link to the pattern. You may sell products made from this pattern but not the pattern. I ask that you link back to my post. Please do not copy of reproduce pictures. When in doubt ask me, tonjapebenito@gmail.com.**


